10 Gmail Tips & Tricks to Supercharge Your Email Productivity


You walk to your desk, open your laptop, and face the daily challenge of email productivity – an inbox flooding with 100+ unread messages.
Your heart sinks when you spot that urgent client email buried under newsletter subscriptions from three days ago. You didn’t see it in time. Poor email productivity has struck again.
Sound familiar?
A messy inbox does more than stress you out – it makes you miss what matters. Think about the team update you overlooked or the deadline reminder lost in the chaos.
In this post, you’ll discover practical ways to take charge of your inbox and get more done. These tips will help you spot important emails faster and spend less time managing messages.
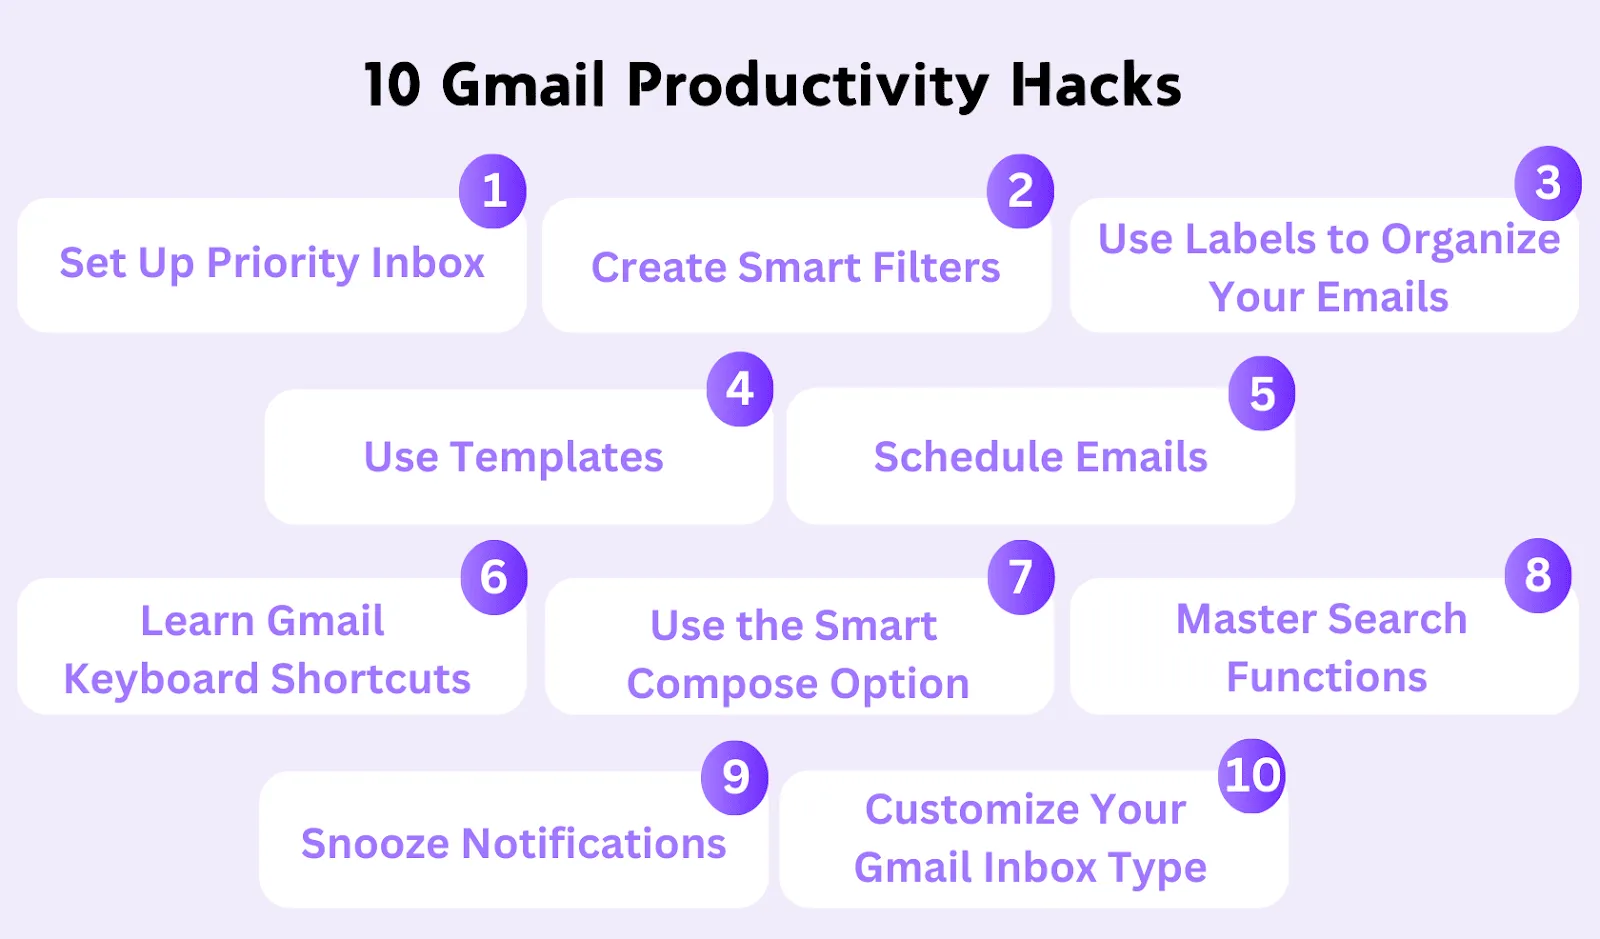
Take Control: 10 Gmail Tips for Effortless Productivity
Managing emails doesn’t have to feel overwhelming. You can transform your inbox from chaotic to calm with the right tools and strategies. From organizing and cleaning your inbox to mastering filters and search functions, these tips will help you take control and make email work for you.
Let’s dive in!
1. Set Up Priority Inbox
When you open your inbox, do you find a jungle of messages mixed up? We’ve all been there—a client’s urgent request rubbing shoulders with yesterday’s lunch invites and today’s enticing offers.
The result?
Chaos, pure and simple!
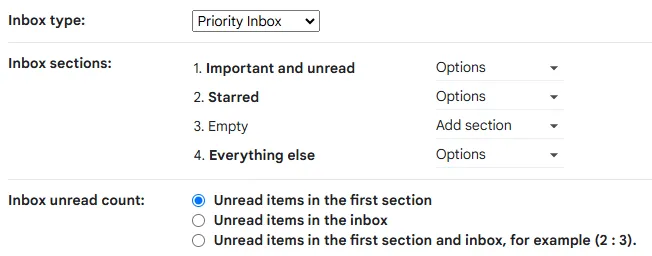
But Gmail’s Priority Inbox can be your lifeline. This clever feature sifts through the clutter, sorting emails into neat sections like “Important and Unread,” “Starred,” and “Everything Else.”
Here’s how to set it up:
- Go to Gmail Settings > Inbox tab.
- Select ‘Priority Inbox‘ from the inbox type dropdown.
- Customize section names and display preferences.
- Choose which emails appear in each section.
- Train the system by marking emails as important/not important.
Once Priority Inbox learns your habits, it’ll keep essential messages front and center, saving you from endless scrolling. With time, this tool becomes an invisible hand, helping you find what matters without breaking a sweat.
2. Create Smart Filters
Another useful Gmail feature that can boost email productivity is smart filters.
With them, you can categorize and sort emails without lifting a finger. These filters move newsletters to designated folders, mark project updates as important, and even auto-archive promotional emails you rarely read.
Gmail offers robust filtering options that go beyond basic sender and subject rules. You can filter by specific words, attachments, email size, and date.
Here’s how to set up smart filters:
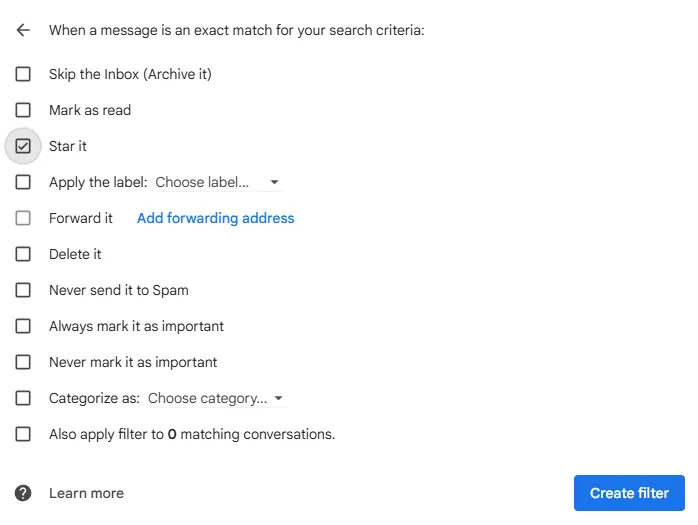
- Click the search options arrow in Gmail’s search bar.
- Enter your criteria (sender, subject, words, attachments).
- Click “Create a new filter” at the bottom.
- Choose actions (archive, mark read, apply label).
- Select “Apply to existing emails” if needed.
Use advanced Gmail filters to organize your inbox better and save time:
- Find emails with attachments: Use the
has:attachmentfilter to instantly locate messages that include files.
- Show recent messages: Use the
newer_than:2dfilter to view only emails from the last two days.
- Filter out newsletters: Search for emails containing the word “unsubscribe” in the footer to remove promotional clutter.
- Organize financial emails: Create filters for terms like “invoice” or “receipt” to sort payment-related messages automatically.
- Stay focused on important emails: These smart filters prioritize key messages while letting less critical ones wait.
3. Use Labels to Organize Your Emails
When your inbox is overflowing, sorting through it quickly becomes essential. Gmail’s labels and categories act like digital filing cabinets, organizing your messages into neat piles. With this system in place, you’ll find important information quickly rather than wasting precious minutes.
Gmail’s default categories include:
- Primary: For personal and important emails.
- Social: For notifications from social media platforms.
- Promotions: For marketing emails and offers.
Take it a step further by creating custom labels, such as:
- “Client Projects” for ongoing work.
- “Team Updates” for collaboration emails.
- “Urgent Tasks” for high-priority messages.
With these labels in place, you’ll easily spot important emails when you open your inbox.
Here’s how you can set up labels for your Gmail inbox:
- Open Gmail and find ‘More‘ in the left sidebar.
- Click ‘Create new label‘.
- Name your label (example: “Client-Project-A”).
- Choose a color for quick visual recognition.
- Add nested labels if needed.
You can also combine labels with filters to automatically sort emails into the right categories as they arrive. For instance, set a filter to label emails from a key client as “Client Projects,” so they bypass your inbox and go straight to their spot.
This setup is ideal when handling high email volumes or managing messages from different teams or projects. It keeps your inbox organized, reduces clutter, and ensures important emails are always easy to find.
4. Use Gmail Templates
Isn’t it frustrating to type the same response over and over? Your productivity takes a real hit when constantly replying to similar emails.
Instead of rewriting the same details each time, use Gmail’s Canned Responses (or Templates) feature. With it, you can save commonly used replies and pull them up whenever you need, without any extra typing.
“We use Gmail’s templates for handling common questions. When someone asks how our mentorship process works, we have a pre-written response covering everything from signing up to what the sessions look like. It’s a huge time-saver and ensures consistent responses, no matter who’s replying.”
– Dominic Monn, Founder at MentorCruise
Templates are ideal for teams that deal with repetitive communication, such as customer support, sales, and HR. They help send quick, consistent responses to frequent questions, updates, and routine requests.
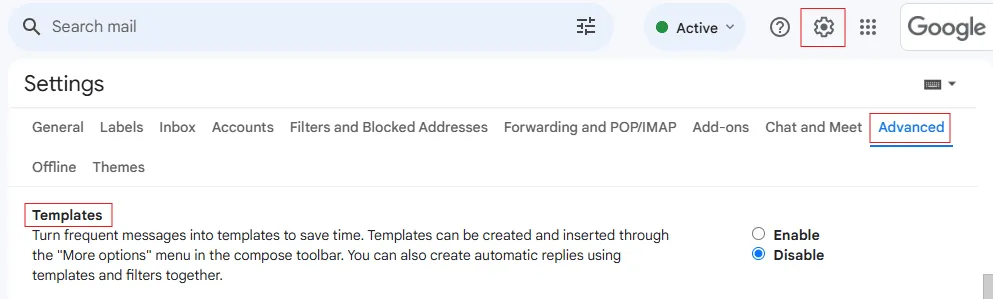
Here’s how to set up Canned Responses (Templates) in Gmail:
- Open “Settings” by clicking the gear icon in Gmail.
- Go to the “Advanced tab”, find “Templates”, and click “Enable.”
- Save your changes; Gmail will reload automatically—don’t worry, this is normal.
- To create your first canned response, start by composing a new email.
- Type the message you want to save as a template.
- In the bottom right corner of your draft, click on the three dots, select “Templates”, then choose “Save draft as a template.”
- Name your template for easy reference later.
Whenever you need that response, go to Templates in your email, select the saved message, and insert it instantly. With these templates, you’ll save time, stay consistent, and handle your inbox more efficiently.
5. Schedule Emails
Scheduling emails is an easy way to stay productive and strategic. Do you need to reach someone in a different time zone or ensure your message lands when they’re most likely to check their inbox?
By timing your emails just right, you can ensure they appear at the top, increasing the chances they’ll be seen and acted on promptly.
Here’s how to schedule emails in Gmail:
- Log into Gmail and click the Compose (pencil) icon.
- Write your email as usual, but don’t click Send just yet!
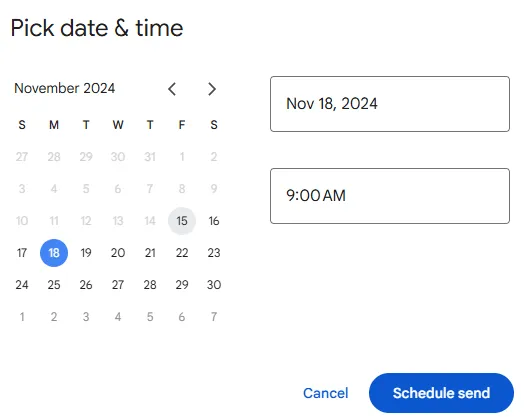
- Next to the Send button, click the small downward arrow.
- Select “Schedule Send” and choose a specific date and time. Gmail allows you to schedule up to 100 emails at once.
- If you need to change the scheduled time later, go to the Scheduled folder on the left panel.
- Open the email you want to reschedule, adjust the time, and click “Schedule Send“.
At DesignRush, we use the email scheduling feature to ensure no one feels pressured to respond outside their regular hours. Even if we catch an email early on Friday, we schedule it for Monday morning, giving everyone the weekend to recharge.
It’s a simple yet effective way to respect boundaries, maintain a healthy balance, and keep our workflow efficient and on track.
6. Learn Gmail Keyboard Shortcuts
Mastering keyboard shortcuts can dramatically speed up your inbox navigation. By keeping your hands on the keyboard, you maintain a steady workflow without the interruptions caused by switching to a mouse. This seamless approach helps you stay focused and efficient.
Learn these Gmail shortcuts to boost productivity:
Email organization
- Mark all emails as read: Highlight conversations with “* A” and press “Shift + Ii.”
- Select only unread emails: Press “* U” to filter your inbox to show unread messages.
- Select read emails: Press “* R” to highlight emails you’ve already read.
- Select all emails: Highlight all emails in your inbox with “* A.”
- Select starred emails: Press “* S” to view only starred emails.
- Select unstarred emails: Use “* T” to see unstarred emails.
Composing and editing emails
- Compose a new email: Press “C” to open a new message instantly.
- Indent your emails: Create an indent with “Command + }” or remove it with “Command + {.”
Email addressing
- Add CC: Press “Ctrl/Command + Shift + C” to add recipients in CC.
- Add BCC: Use “Ctrl/Command + Shift + B” to reveal the BCC option.
Email follow-up
- Mark an email as unread: Press “Shift + U” to mark it as unread after reading.
7. Use Gmail Smart Compose
Writer’s block can hit even with simple emails, often at the worst times. That’s where Smart Compose, powered by AI, steps in to help you write faster and with ease.
Gmail watches how you write over time, picking up on your style. The AI suggests words and phrases as you type, offering gray text ahead of your cursor.
These suggestions are like a helpful nudge, offering professional greetings, meeting times, or even those phrases you always use. If you’re typing out names or addresses, Smart Compose is there to help, too.
When you see a suggestion you like, simply hit the tab key to use it. If it’s not right, just keep typing, and the suggestion disappears. The more you use it, the better the AI predicts what you’re trying to say, and the more natural it feels.
To activate it:
- Go to your Gmail settings.
- Navigate to the “General” tab.
- Toggle “Smart Compose” to “on.”
- Save your changes to activate the feature.
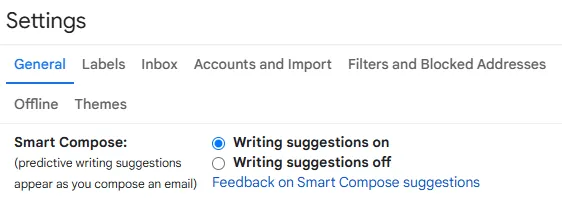
Over time, it will learn your writing habits, so your emails will sound just like you—only faster.
While Smart Compose is a useful tool, Victor Karpenko, Founder of SeoProfy, advises using it carefully.
“It’s great for routine emails—like confirming meetings or sending quick updates. But I avoid it for important messages, like client pitches or sensitive matters.
Those emails need a personal touch, and relying on auto-suggestions can make them feel generic or off-tone.”
8. Master Gmail Search Functions
Searching can be a pain, especially when you’re sifting through hundreds of emails to find the one you want. But with Gmail’s powerful search functions, you can quickly get exactly what you want.
Here’s a quick guide to help you search emails easily on Gmail:
Search by email attributes
- Search for emails without a label: Use
has:nouserlabelsto find emails without labels.
- Search for emails with a label: Use
has:userlabelsto find labeled emails.
- Search by message ID: Use
rfc822msgid:followed by the message ID to track specific messages.
- Search by category: Use
category:to search for messages in specific Gmail categories like Promotions or Social.
- Search by CC or BCC recipient: Use
cc:orbcc:followed by an email address to search for messages sent to those recipients.
- Search for mailing list emails: Use
list:to find emails from mailing lists.
Search by content
- Search for an exact phrase: Use
"meeting agenda"to locate emails with the exact phrase.
- Search for keywords in proximity: Use
budget AROUND 5 proposalto find emails where the words “budget” and “proposal” are within five words of each other.
- Exclude words: Use
-unsubscribeto exclude promotional emails from search results.
Search by size and date
- Search for emails by size: Use
smaller:orlarger:followed by a size to find emails based on byte size.
- Search for emails by date: Use
older_than:ornewer_than:followed by a time frame to find emails within a date range.
Search by status
- Search for starred, unread, or snoozed emails: Use
is:starred,is:unread, oris:snoozedto find messages with these statuses.
Search for attachments
- Search for attachments: Use
has:attachmentto locate all emails with attachments.
- Search by file type: Use
filename:.pdforfilename:report.docxto find specific types of files.
- Search by file size: Use
larger:10Morsmaller:5Mto find emails based on attachment size.
Search by date
- Search for recent emails: Use
newer_than:6mto display emails from the last six months.
- Search for older emails: Use
older_than:1yto find emails older than one year.
- Search by exact date range: Use
before:2023/01/01orafter:2023/07/01for specific date searches.
Search by label
- Search within a label: Use
label:work-projectsto display emails tagged with a specific label.
- Combine labels with status: Use
label:client-updates AND is:unreadto find unread emails under the “Client Updates” label.
Search by sender or recipient
- Search for emails from a specific sender: Use
from:john.doe@gmail.comto locate all emails sent by John Doe.
- Search for emails sent to a recipient: Use
to:team@example.comto find all emails sent to a particular address.
Exclude unwanted emails
- Filter out newsletters: Use
-unsubscribeto remove promotional emails containing the word “unsubscribe.”
- Exclude specific terms: Use
project -budgetto find emails mentioning “project” but exclude those referencing “budget.”
Example queries
- Locate recent emails from your manager with attachments:
from:manager@example.com has:attachment newer_than:1y.
- Find PDF invoices received after January 1, 2023:
label:invoices filename:.pdf after:2023/01/01.
- Display unread, unstarred emails in your inbox:
in:inbox -is:starred -is:read.
Mastering these search operators will save time and effortlessly help you find the emails that matter most.
9. Snooze Notifications
When your inbox feels overwhelming, Gmail’s Snooze feature helps you stay focused by hiding non-urgent emails until you’re ready.
How to Use It:
- Hover over an email in your inbox.
- Click the clock icon on the right.
- Choose a predefined snooze time (e.g., “Tomorrow morning”) or select Pick date & time for a custom schedule.
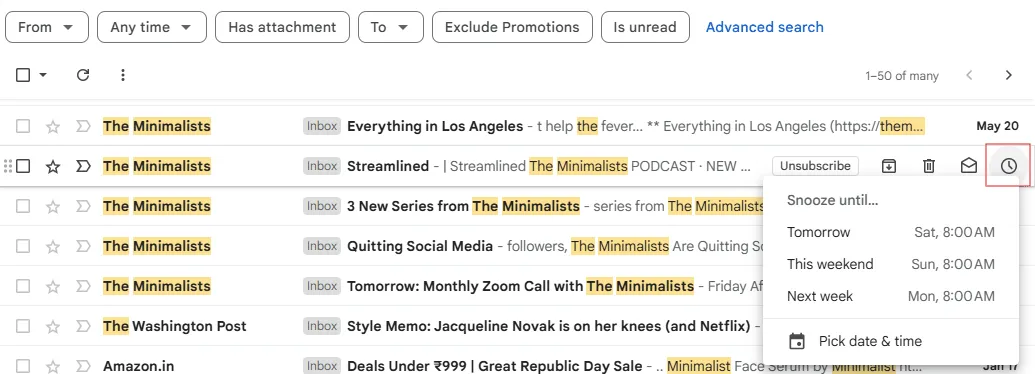
The snooze feature ensures emails pop back into your inbox when relevant, allowing you to prioritize what matters now without losing track of other tasks. It’s a simple way to reduce distractions and stay organized.
“I usually work in 2–3 hour focus blocks, and by snoozing non-urgent emails for that time, I avoid constant interruptions. Last week, I completed a project early because I wasn’t distracted by emails. Now, I handle emails on my terms, focusing on high-priority tasks when I’m ready.”
– Jason Hennessey, Founder and CEO of Hennessey Digital.
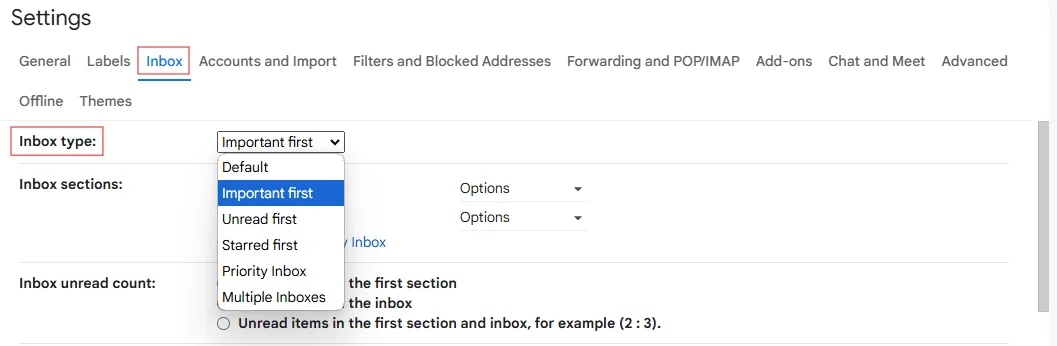
10. Customize Your Gmail Inbox Type
You know how emails can quickly pile up, making it hard to find what’s important? Gmail’s Inbox Type feature can help you stay on top of things.
For instance, if you always need to see unread emails first, this simple setting lets you do just that. To do so, go to your Gmail settings, find the “Inbox” tab, and choose the inbox type that works best for you.
Adding More Customization:
Here are some additional Gmail customizations you can try:
Show/Hide Apps in Gmail:
If you don’t use Gmail’s Chat, Spaces, or Meet features, you can hide them for a cleaner interface:
- Go to Settings > See all settings > Chat and Meet tab.
- Toggle off these features to declutter the sidebar.
Change the Display Density:
Adjust how compact or spacious your inbox feels:
- Click the gear icon and choose between Default (shows email previews), Comfortable (hides previews but keeps spacing), or Compact (minimal spacing for a tighter view).
Use Themes for Personalization:
Add some visual flair to your inbox by changing the theme:
- Go to Settings > Themes.
- Select from solid colors and patterns.
- Or upload your image for a custom background.
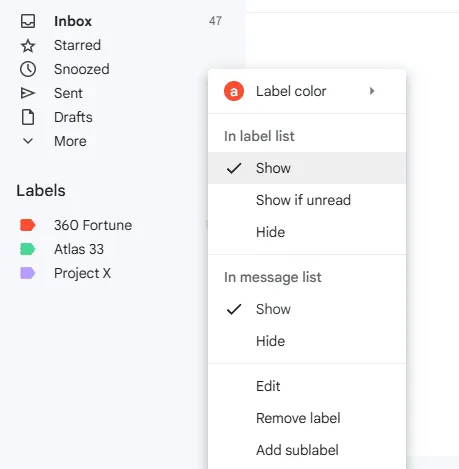
Toggle Between Compact and Expanded Labels:
Gmail allows you to hide or show labels on the sidebar to suit your workflow:
- Hover over a label on the left-hand side, click the three dots.
- Choose Show, Hide, or Show if unread.
Whether you want unread emails to appear first, messages from certain senders prioritized, or your interface decluttered by hiding unused apps, Gmail will adjust to fit your needs.
Once you save the changes and explore additional customizations like themes and label management, your inbox will be better organized, visually appealing, and tailored to help you focus on what’s most important.
Ready to Boost Your Email Productivity?
Implementing a few simple tweaks to your Gmail can make a big difference. From organizing your inbox with labels and filters to using snooze features for focused work time, small adjustments can help you manage work emails more efficiently.
Set up smart folders to easily track client communications or important leads and master search functions to find what you need quickly. These changes are easy to make but can save you hours every week. Start making these updates today and feel the boost in your email productivity!
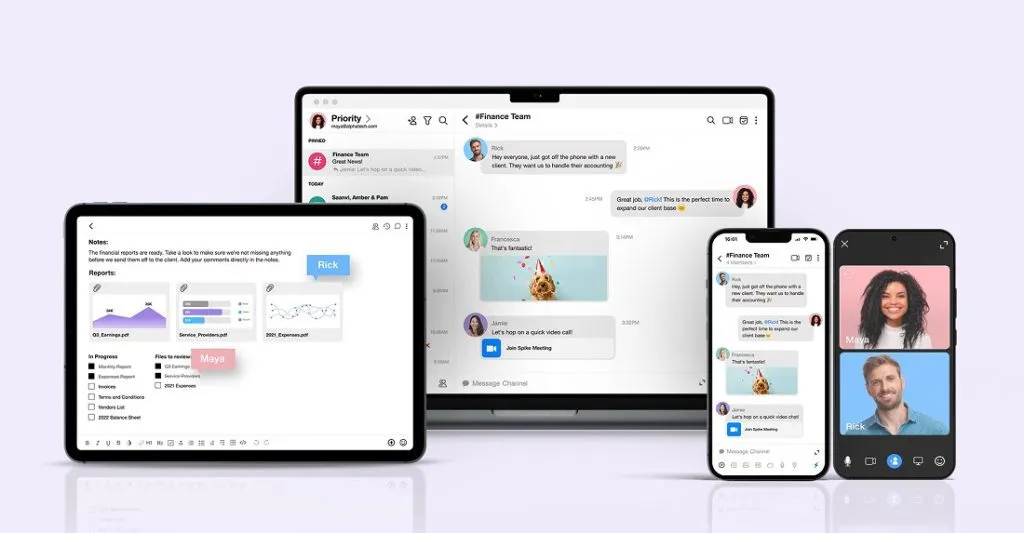
These Gmail enhancements can transform your productivity, but try Spike for those seeking a next-level email experience.
With chat-like conversations, a unified inbox, and built-in tools like notes and tasks, Spike simplifies email management and makes staying organized effortless.
Author Profile:
Name: Gianluca Ferruggia
Title: General Manager, DesignRush
Bio: Gianluca Ferruggia is a seasoned digital marketer with 8+ years of experience in the field. His career started with SEO and PPC until he branched out to other facets of digital marketing, sales, and business development. He is currently the General Manager at DesignRush, leading a team of 100+ professionals.